Because the scale lies…

Whenever I have a new personal training client, they know that they are working hard, but why won’t the scale move?

The scale lies.

There are so many factors to weight–water weight, hormones, fluctuating everything.

Weight Watchers (which I love) recommends stepping on the same scale once a week at the same time of the day. Only over a week can you truly see if you are making progress.

When you start a new exercise or nutrition program, a really good way to see if it’s working is by taking measurements.

Get an old fashioned measuring tape like this one:

https://smile.amazon.com/Singer-00218-60-Inch-Tape-Measure/dp/B000B7Q9FM/ref=sr_1_1?ie=UTF8&qid=1481176861&sr=8-1&keywords=measuring+tape+for+body

Measure around your waist.

Measure around your hips.

Measure around your thigh.

Record those measurements in a top secret diary. No one has to see this except you. Letting a close friend or paid trainer know could help keep you accountable–but it’s not necessary.

Check out your measurements 30 days after the program.

Do celebratory jumping jacks if the numbers improved.

Try something new if the numbers did not improve. The best diet in the world is actually a simple food diary. If you record everything you eat over at least a week to a month, you can figure out what is going wrong. Also, knowing that you must write down everything you ate and at least be accountable to yourself makes you think twice about the second cookie…

Newsflash: I am now able to offer health coaching from afar with a purchase of an Arbonne 30 Day Nutrition Starter package. Private message me for more information.

Check out my shop:

lisashieldspilates.arbonne.com
 

Advertisement

The Surprising Trick to Flat Abdominals and a Strong Core

So you work out, eat right, lift weights, follow every fitness trend (or not)–but you may still have that little (or big) bulge on your stomach. My mother calls it the “ponch.” On men, it’s the gut or keg or…you get the picture.

Before scouring the internet for the latest exercises or strange devices that promise results, check in–can you touch your toes with straight legs? If not, your hamstrings, the muscles on the back of your thighs, may be to blame.

In Pilates, every exercise we do is in some way related to the idea of “neutral pelvis.” This is the position when your hip bones are facing directly ahead, they are not tilted one way or the other. If you were to lie on your back, those hip bones would be facing directly to the ceiling with bent knees. Working from neutral pelvis is the key to getting the muscles in the lower part of your trunk to fire. It’s often not just your rectus abdominus, but also the iliopsoas and pelvic floor muscles. If you can get them strong, they will support your lower back and much of your back pain can be eliminated. You can also feel confident wearing low rise jeans.

But–if you have tight hamstrings, you can’t physically be in neutral pelvis while standing. That means all day long, when you sit, stand, run–you are not toning that tummy. You can go to the gym for hours a day or bike, hike, whatever, but if your hamstrings are very tight–you won’t get the results you desire.

There is a lot to this idea of Pilates and I recommend getting started with an instructor knowledgable about “west coast” Pilates style for a broader perspective on neutral pelvis. But in the meantime, start stretching your hamstrings!

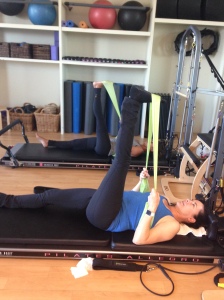
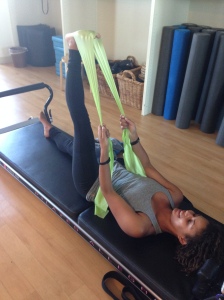
Here is a stretch to get you started from my lovely students Donnyale and Ann:

IMG_3771 IMG_3772

You want to be able to have a totally straight leg. Once your leg is at a 90 degree angle and totally straight, there will no longer be a  shift in your pelvis away from neutral. Grab a belt, towel, loop from your bathrobe–any tool to help you accomplish this. You do not need a fancy theraband or yoga strap.

And–if you favor group exercise classes, don’t leave early and skip the stretches. You are doing your body a disservice. Your tummy will thank you as it becomes more toned.

One of the reasons that post natal women often struggle with the ponch is that their pelvis has totally shifted during the pregnancy so it takes awhile to get it back to neutral. Post natal students should most definitely stretch their hamstrings to hasten the progress.

Cheers!

The only abdominal/core exercise you’ll ever need

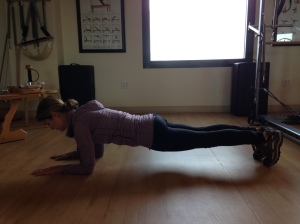
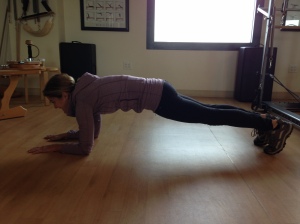
Crunches are over-rated. In a desk-bound, car-bound world, we don’t need anything else to bring our shoulders forward. If you do one exercise, let it be a plank on your elbows:

IMG_3751

This will get your stomach toned and strong and support your posture. Notice how my hips are in line with my shoulders and ankles. Pull your stomach in to your back as if you are in a high school reunion picture that will be posted all over Facebook.

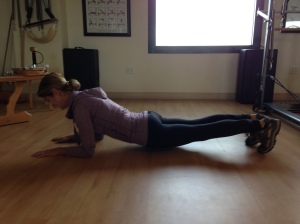
Make sure you don’t arch your back:

IMG_3753

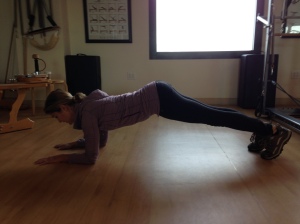
Lift your bottom above your shoulders:

IMG_3752

Or, scrunch your shoulders to your ears:

IMG_3754

Send those ears away from your shoulders as if you are under a waterfall in Hawaii or wherever your happy place may be.

Now, a good goal is to be able to hold this plank for two minutes. Here is your schedule to accomplish this in two weeks. Yet– I must mention that this is an exercise program. A plank is an exercise. Do these moves at your own risk and be sure to consult a doctor before starting any new exercise.

Day 1: Hold for 10 seconds. Repeat 3 times.

Day 2: Hold for 10 seconds. Repeat 3 times.

Day 3: Hold for 20 seconds. Repeat 2 times.

Day 4: Hold for 20 seconds. Repeat 3 times.

Day 5: Hold for 30 seconds. Repeat 3 times.

Day 6: Hold for 40 seconds. Repeat 3 times.

Day 7: Hold for 50 seconds. Repeat 3 times.

Day 8: Hold for 1 minute. Repeat 2 times. Then get up and do your happy dance! You are on your way to a strong core and flat abdominals!

Day 9: Hold for 70 seconds: Repeat 2 times.

Day 10: Hold for 80 seconds. Repeat 2 times.

Day 11: Hold for 90 seconds. Repeat 2 times.

Day 12: Hold for 100 seconds. Repeat.

Day 13: Hold for 110 seconds Repeat.

Day 14: Hold for 2 minutes! You did it!!!!!

Notice how you do more repetitions with the shorter holds. I have developed this program so that you ease into the two minute plank. If while you are holding the plank, you start to feel it in your back, stop. In Pilates, the form is more important that the repetitions or how much weight you lift. This program will assure that you are able to hold Plank with proper form and keep tension out of your back and neck. Newer exercise students make take longer than the two weeks to accomplish the two minute hold. Always listen to your body and do the exercise with ease. Also, don’t forget to breath. Holding your breath will not help you on this series.

This exercise is really great for anyone who is post-natal. I recommend walking, planks, and kegels for the first six months.

How to love kale

Kale has grown on me to the point that I crave it. Thankfully, it has tons of nutrients and gives me energy. My kids–aged two and four love it too! How can that be?

Kale is a very woody vegetable that often needs a little doctoring up. I recommend starting with baby kale if you can find it in your grocery store. The triple washed baby kale at Trader Joe’s is fabulous.

IMG_3737

However, buying regular, triple washed bagged kale is a disaster! Do not buy this or something like it:

IMG_3736

The problem is that when regular kale is triple washed and bagged, the companies leave the stems on with the leaves. Unless you are sautéing or throwing the kale in the soup, this will be very chewy and earthy.

If you can’t find triple-washed BABY kale, this is a time when you must buy kale and wash and dry it. I learned from Jessica Seinfeld’s “Can’t Cook Book” how to properly use kale and I’ve been hooked ever since.

You must fold the kale leaves and then tear off the stems. Do not eat the stems.

The only time that I can use regular bagged kale or the stems is when I make a pesto with kale. It sounds crazy, but it’s delicious. But I still think it’s better without the stems. I like using nuts, oil, fresh herbs, garlic and the kale. I put it on pizza, pasta, chicken, with some ricotta as a dip…the list goes on and on.

Kale Pesto Recipe:

2 cups packed fresh kale

5 leaves of fresh basil

2 cloves of garlic

1/4 cup walnuts (lightly toasted is also good if you have the extra time)

2/3 cup EVOO

salt and freshly ground black pepper to taste

1/4 cup grated parmesan cheese (any kind will do–even Kraft tastes good)

First, grind the nuts and garlic with 1 TBS of the oil. Then add a handful of kale and the basil with more oil. Continue to add kale and oil until you have a nice consistency. At the end, add the cheese, salt, and pepper. I like to have the food processor going and add the oil as it purees. Then your pesto won’t separate later.

My kids love eating “green pizza.” I just put it on any pizza crust, homemade or store bought, and add some shredded mozzarella.

A great party dip is to add 1/4 cup ricotta cheese at the end and serve with pita chips.

No excuses veggies for kids

Just like I always have things on hand for my salads; I also stock a few basic ingredients for my children’s “salads.”

IMG_3745

1. Baby Carrots–rinse and serve. Easy. Just like triple-washed salad greens, if I have to peel the carrots, they may not make it on the plate in time.
2. Broccoli–raw or steamed. To steam- place chopped broccoli in a ceramic or glass bowl. Add about 1/4 cup of water.

IMG_3746

Place a plate on top of the bowl and microwave for 2.5 minutes. Voila. I often put a little EVOO and parmesan cheese on this method, but plain always works for my children’s palates.

IMG_3748
3. Frozen peas–take a couple handfuls of these and a tablespoon of water. Microwave in a small ceramic or glass bowl for about a minute. Serve. You can add butter or salt if that is in alignment with your food view. Plain is always good too.
4. Apples–slice and serve.

I have cute plates with slots for various toddler/preschool foods. I put the veggie in one compartment. I put some sort of dip in the other. My go-to dips are ranch dressing or hummus.

I learned from my friend Becky to just put the healthy food out before the meal. Around the witching hour, those kids get hungry and pickier eaters are more likely to choose the healthy option.

This is not perfect eating, but my kids are getting fiber and nutrients from this arrangement. Often times a very kid friendly food such as macaroni and cheese, plain pasta, pizza, or hot dog (all beef, nitrate free) are served alongside the fresh fruit or vegetable.

How do you get your children to eat and enjoy fresh fruits and vegetables?

No excuses bistro salad recipes

I am a busy, working mother. Streamlining my routine and lifestyle are essential. Eating salads are important to my feeling and looking my best. I would like to say that I only shop at the fantastic local farmers markets or I exclusively eat greens that I harvest from my own garden, but this isn’t the case. Yet–I manage to eat at least one, if not two delicious salads a day. How do I do this?

IMG_3738

1. Triple Pre-washed organic salad greens. I prefer the herb salad mix from Trader Joe’s, but there are great kits at most grocery stores. If I have to take the time to rinse and dry heads of lettuce, I will not do it consistently. I need fast and easy.

IMG_3737
2. Add some sort of fruit. I usually have grape tomatoes in my fridge or counter. Then, I do not even have to cut them before throwing them in the bowl. I also frequently use apples or oranges if I have them. Sometimes, I keep a can of chopped, sun-dried tomatoes in the pantry so I can quickly use them too.
3. Cheese is essential for protein and fat. I like to keep some delicious, easy cheese in the fridge. I often have blue cheese, feta, or fresh mozzarella. Even shredding up some cheddar or jack can be festive. Watch the portions on the cheese–1-2 TBS is great. If dairy isn’t your thing, having cans of tuna in the pantry is also good.
4. Add nuts. I often keep walnut halves/pieces or slivered or shredded almonds in the fridge. How much you add depends on how much you are dieting. 1 TBS of nuts is good.
5. Balsalmic vinegar & EVOO. My mix is 1 TBS oil to 1 TSP vinegar for a single salad. Cold pressed extra virgin olive oil tastes the best, but regular olive oil is fine too.

Go shopping at the beginning of the week and always keep these things on hand and they become the easiest thing to grab. This is my lunch on most days and it becomes the side dish to whatever dinner we are having. Often times that main dish could be frozen, but we have the delicious fresh salad to finish it well.

How to have a Certified Green Home

Can you make your home “green?” As my cooperative preschool’s co-chair of purchasing, I also need to make sure that we are buying products that are “green.” Our school is certified as “green” by the Bay Area Green Business Program.

The policies are very interesting to give me a guideline of what to buy:
1. Purchase copier/printer paper with at least 30% post consumer waste.
2. Purchase paper towels with 35% post-consumer waste.
3. Purchase toilet paper with 35% post-consumer waste.
4. Do not purchase bottled water except where required for emergency use.
5. Ensure the school is not using polystyrene, such as styrofoam, in beverages and food service ware.

These are just a few of the guidelines that certifies us as green as they pertain to my job of buying things for the school. Previous chairs have broken down which brands and products meet these criterion.

  1. Dishwashing soap–7th Generation
  2. Hand soap– Method refills
  3. Dishwashing machine detergent– 7th generation
  4. Powder Cleanser– Bon Ami
  5. Air freshener– Citrus Magic (from Whole Foods)
  6. Toilet Bowl cleaner– 7th Generation
  7. All purpose spray cleaner– 7th Generation
  8. Glass Cleaner– 7th Generation
  9. Paper Towels– 7th Generation
  10. Toilet Paper– 7th Generation
  11. Napkins– 7th Generation

What are the ways that you “green” your home? Are there products or practices that help you? What things are you doing in your communities to promote this lifestyle?

Emily Henderson said I can have a bohemian chic paradise by shopping at Target…

I am an expert in fitness and health, but in home decor–not so much. I have been inspired by beautiful blogs like younghouselove.com. They stopped blogging, so I have been searching for something to fill that gap. Enter: stylebyemilyhenderson. Ugh. Even with all the money in the world, I am not sure I can achieve that level of chic. But still, half the stuff right now is from Target. I thought to myself, I can do that right?

Look, all you have to do is go to Target and your place will look like something out of a magazine, right?!!! And all those knick knacks won’t become weapons for your toddlers and preschoolers right? They will stay on the shelves perfectly styled. Doesn’t she have a two year old? They don’t lock him in a play pen and say, “Don’t touch Mommy’s things…” with just a touch of Mommy Dearest, right?

Seeing this ad on the Target website:
http://www.target.com/c/home/-/N-5xtvd#?lnk=ct_menu_03_1&intc=1865089|null
I went to my local Target and attempted to create fall, bohemian chic in my abode.

IMG_3733

It’s just not there yet. I think a big part of the problem is the “slipcover over the slipcover” Pottery Barn sofa. I will save that for another post. Maybe my palette isn’t “tight” enough.

So dear Reader, these home experiments can just be a laugh with me while I try to be a style blogger. I’ll stick to Pilates.

When to buy organic and when to save money on conventional fruits and veggies

My children attend a cooperative preschool. That means that the parents are very active in the community and even teach at least one day a week at school. We joined at my prudent husband’s suggestion, but soon realized it was a magical place that was very good for our children and for us. Besides teaching one day a week, each family is also assigned a job at the school My jobs are to teach the really fun dance class and to do the grocery and paper goods shopping. For me, this is easy because the guidelines for purchasing are already in alignment with what I do at home. I love local, organic produce but sometimes it is not always practical. Still, the “dirty dozen list” was in my guidelines and it was a good reminder for me. I don’t know who the original publisher of this list is, but just enjoy the information.

So, the twelve most contaminated fruits and vegetables (meaning get organic if possible) are:
1. Peaches
2. Apples
3. Sweet Bell Peppers
4. Celery
5. Nectarines
6. Strawberries
7. Cherries
8. Pears
9. Grapes
10. Spinach
11. Lettuce
12. Potatoes

Twelve Least Contaminated–meaning conventional can be OK
1. Onions
2. Avocado
3. Sweet corn (frozen)
4. Pineapples
5. Mango
6. Asparagus
7. Sweet Peas (frozen)
8. Kiwi fruit
9. Bananas
10. Cabbage
11. Broccoli
12. Papaya

Eating well is important; so is staying on budget. Save money on the conventional things, but really spend on the contaminated items and get organic. Cheers!

How to Maintain (or even lose) Weight on a Cruise

I just got back from a lovely cruise aboard the Westerdam of the Holland America Fleet to Alaska. As a personal trainer and fitness guru, I could not help but notice that the plethora of food could possibly be a waist line catastrophe for most. So, I came up with some tips for anyone looking to enjoy the cruise to the fullest while still fitting into those jeans by the end.

  1. Follow the One Plate rule at buffets: Go to the buffet. Do a walk around and survey the offerings. Get ONE plate and fill it up without stacking it. You must be able to see all the items at one time on the plate. DO NOT GO BACK for seconds. Realize, you will be on this ship enjoying the same buffet for at least seven days. There will be time to sample everything.
  2. BEWARE the salad bar: Getting a salad at the buffet is deceptive. It can often end up calorically higher than the food you actually wanted to eat when you add the calories in dressings, cheeses, and croutons. Having a salad does not necessarily mean that you will maintain your waist line. Eat what you really want and enjoy it in modest portions.
  3. Have dessert once a day: On my cruise, breakfast was dessert. Lunch buffet had too many desserts. Ice cream was available twenty four hours a day. Yet, the really beautiful and decadent desserts were served in modest portions at the sit down reservation dinner. I chose to eat my dessert then. Whatever your pleasure, have it once a day.
  4. Skip the snacks: I ascribe to the theory that both three square meals a day and four-five small meals a day will both work–if you pick ONE method. On a cruise, the meals are so plentiful that you are bound to get all your calories in one go. This is not the time to eat the large meals, then go to cocktail hour, then go to high tea, etc. The cruise is meant to be a time a feasting, but just do that three times a day.
  5. Exercise: On a ship of nearly 3,000 guests, I saw the same ten to fifteen people in the gym daily. I went at different times too. Burn some calories so you can enjoy more food.
  6. Take a walk around the ship after big meals: I learned this trick while I was pregnant with my second child and experiencing gestational diabetes. In order to regulate my blood sugar, I had to take a ten to twenty minute walk within one hour of starting my meal. When I did this, I did not need to take insulin. I find that it can help anyone whether they experience diabetes or not. On our ship, the third level was designed for laps and if you did three, it would equal one mile. Make it a point to do that after every meal and you will maintain your weight and feel better. You will lessen the food coma effect and possibly have more energy for the casino or the dance floor.
  7. Take all of the fitness classes that the ship offers: On my cruise, the classes were very limited, but the teachers were excellent. Use the cruise as an opportunity to try new modalities and begin an exercise program if you are not already engaged in one.
  8. Book a session with the cruise personal trainer: Again, my cruise featured great trainers. If you currently work with a trainer at home, keep the routine up on the ship. If you don’t work with a trainer, consider this a decadent splurge to jumpstart your health and wellness. You will get more out of this service than a massage.
  9. Limit alcohol to two drinks a day: I know, this is a bummer. You are finally on a cruise and you want to let loose. Yet this trip will be at least seven days. Your waist line and your wallet will thank you for limiting alcohol intake. This suggestion is actually hard to follow with the attentive waiters at your beck n call offering you drinks at all hours of the day. Sure, you are watching the sea, spending time by the pool…but if you start the drinks early in the day, you most likely ditch the walk around the decks and all the fitness classes and opt for a nap or boozey shopping instead.
  10. Order regular portions at the sit-down dinner: Sure, it’s all you can eat and the waiters will bring you three appetizers, two entrees, and two desserts if you ask for them (my husband and father-in-law did this), but again, you want to maintain or even lose weight on this cruise so act accordingly.

All of these tips are things I practiced on my last cruise and I maintained my weight and had a great time. Happy Travels!